Download Instructions for Using Translucent Two Pleat Pinch Shirring Tape (TT21) for Drapery Panels and more Lecture notes Material Engineering in PDF only on Docsity!
Instructions For
Translucent Two Pleat Pinch Shirring Tape, (TT21)
Translucent Tape Advantages:
- Excellent for sheer fabrics. - Less obvious when used with any fabrics. - Creates two pleat pinch pleats on panels, top treatments etc. quickly and automatically.
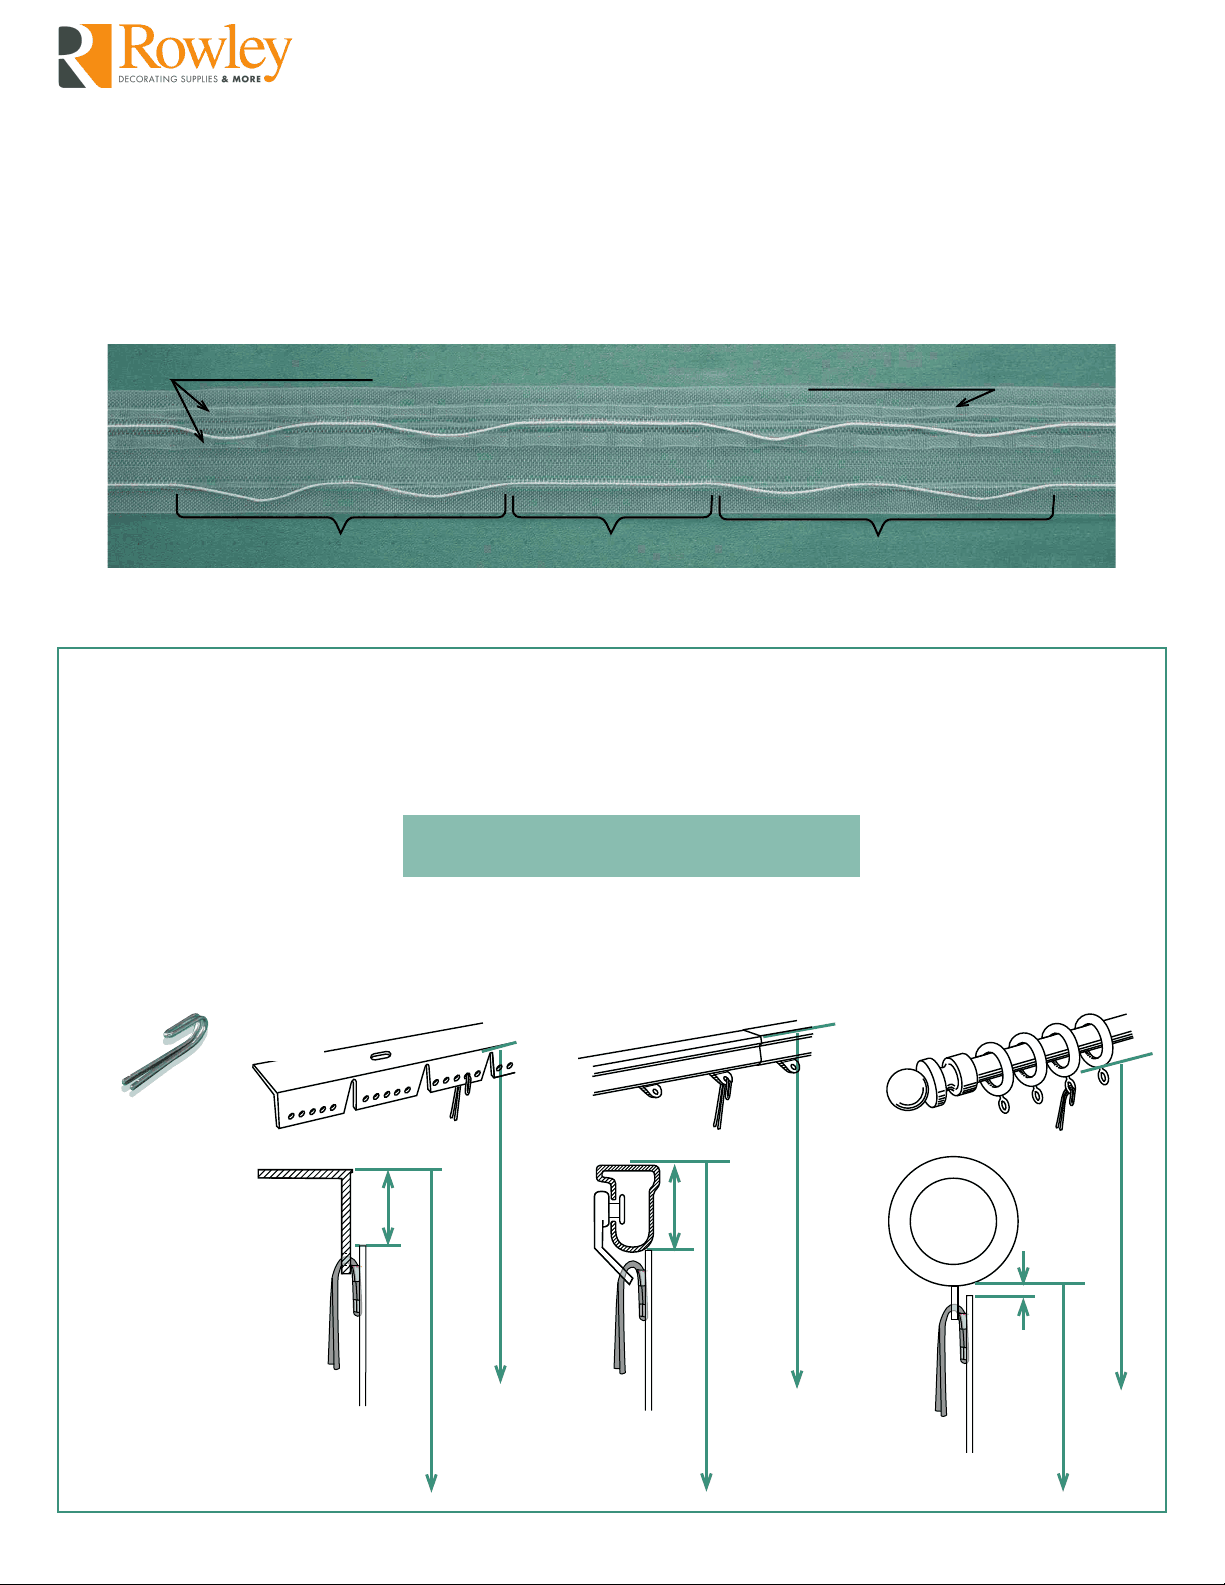
In the pictures below, the draw cords were slightly pulled out to show the spaces and pleats.
Do Not Do This To Your Tape!
Introduction to Translucent Two Pleat Pinch Shirring Tape:
Pleat = 5"
Drapery Hook Pockets
Pleat = 5" Space = 3.2"
Green Thread Indicates a Fullness of 2 1 / 2 Times
Step By Step Instructions:
1a. Many rods with glides or rings, our pleat pin strips (Stock #: HS210 ) etc. can be used with these translucent shirring
tapes. The two-prong drapery hooks (Stock #: DP20 ) should be used with these types of hardware.
1. Hardware considerations and panel length
To determine how far down the top edge of the tape should be from the top edge of the panel: Insert a hook into the piece of tape you are going to use. Take the measurement ( C ) as shown in the figures below. The translucent tape must be positioned so that the distance between the top edge of the tape and that of the panel is C. This allows the hardware to be adequately covered by the treatment. Refer to Step 10a to learn how to insert the hook.
**Panel Finished Length
- Allowance for a Double Folded Bottom Hem
- 5" Extra for Top Hem.**
To determine the panel length: Measure from the top of the strip or rod ( A ) or from the screw eye at the bottom of the ring ( B ) to the window sill or floor or any other desired panel finished length. Fabric Length Requirement :
B
A
A
A
A
DP
C B
C
Tape
Pole Ring
DP
C
Tape
Pleat Pin Strip
DP
HS
Tape
DP
I-37AAA
Updated on 2/26/
Finished Width Excluding Return & Overlap ÷ 3.
Number of Spaces x 8.2 + 5
R
2. Planning for panel width:
Three typical panel arrangements are shown below. The abbreviations are explained as follows: FW: Panel finished width excluding return and overlap. R: Return. O: Overlap. In Figure (2) , although the flaps do not actually overlap, we will still call them overlaps for simplicity.
(3) A pair of panels meeting in the center
(2) A pair of stationary panels not meeting in the center
(1) A single stationary panel
3. Assemble the panels:
Fully assemble the panels to the size as shown in the figure below. Fold the 5" top flap to the back Always round the answer up to the nearest whole number side and press. to get the number of spaces. (e.g. if answer is 13.2, the number of the spaces is 14).
1b. Certain sizes of curtain rods can also be used. In that case,
drapery pins (Stock# DP50, DP53 ) must be used. The top edge of the tape may be placed 1 / 4 " to 2" below the top edge of the panel, based on the desired effects one wishes to achieve. A larger distance creates a ruffle effect. Please note that the drapery header may have a tendency to dip forward when drapery pins are used.
DP
Step 2. Calculate the flat Panel Width Excluding Return and Overlap :
The calculations outlined below will let you make a finished panel width the same or slightly wider than what is required. This is due to the fixed spacing of the tape. The slightly wider finished width will never be a problem for a pair of panels not meeting in the center (Fig. 2). However, for a single stationary panel (Fig. 1) or a pair of panels meeting in the center (Fig. 3) , and if the panel widths are extremely narrow, the extra width may cause panels to not hang evenly.
**Complete Panel Width
- Allowance for Side Hems
- Allowance for Seams if any.**
Step 4. Total Fabric Width Requirement :
Step 3. Calculate the Complete Panel Width.
R
FW FW
O
FW
O
R
FW FW
O
Step 1. Estimate the Number of Spaces per panel using desired finished width excluding return and overlap:
**Flat Panel Width Excluding Return and Overlap
Complete Panel Width
Panel Finished Length
Updated on 2/26/
TT21+
Note:
1. The tape will not let you pleat seams under if the treatment is
pieced together with multiple widths of fabrics. This is true for any automatic pleating tapes. Railroading or using wide width fabric eliminates any seams.
2. The instructions deal mainly with the application of the tape.
Detail of how to make a particular treatment is beyond the scope of this instruction and should be found in numerous instructional books.
3. These tapes are well suited for stationary panels, but not
traversing panels.
10a. Insert two prong hooks:
One hook is needed at the back of each set of pleats and at each end of the panel (4). Insert one of the two prongs into each of the two adjacent pockets (1). Pull both prongs through, while flipping the hook (2). The hook is now securely inserted (3). Hang the panel by inserting hooks into eyes of the pole rings, glides or the holes in the strip as shown at the right (5).
10b. Insert drapery pins:
Pierce the pins directly into the tape at the appropriate position, one pin at the back of each set of the pleats and at each end of the panel (1). Hang the panel on the curtain rod as shown (2).
Tip:
To better define the pleats, one may insert a tacking fastener (Stock #: ST27 ) at the base of each pleat group with tacking gun (Stock #: ST26 ).